BUKU
Now you can continue adding pages and design your booklet to be as large as you like! Don’t forget that the larger you make your booklet the larger you’ll need to make the Gutter so page content doesn’t get lost in the cracks when you bind them together.
Selamat mencuba! Untuk lain-lain tutorial lihat bahagian tutorial.
Tutorial kali ini saya ingin mengajar cara-cara nak print bahan MS Word kepada bentuk buku. Cara ini akan menjimatkan kertas dan juga dakwat printer cikgu, selain itu menjadikan bahan terutama bahan bacaan cikgu menjadi lebih baik. Ikuti langkah-langkah berikut:
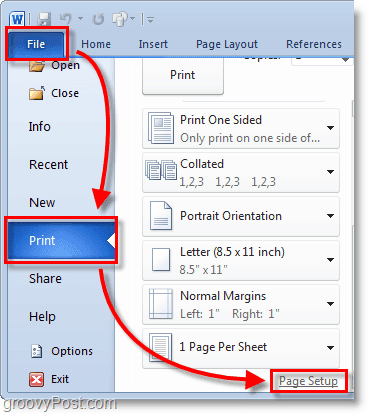
1. Click File, then Print and at the bottom of the list Click Page Setup.
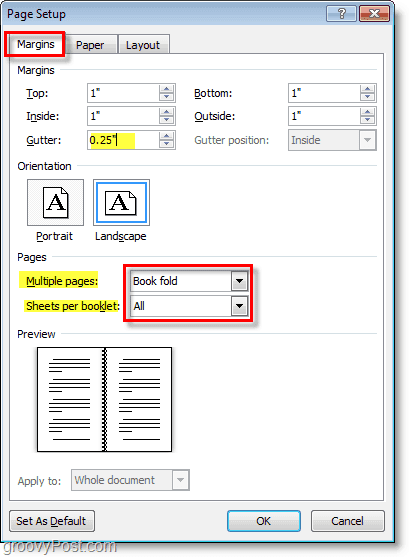
2. In the Page Setup window, Click the Margins tab. Then under Multiple pages Select Book fold from the drop menu. Under Sheets either Select All or the exact amount of pages you plan on having. Be sure to set the gutter to Set the Gutter
to a small margin. The gutter determines the space between your page
content and the fold in the middle of the paper where you would normally
bind pages together.
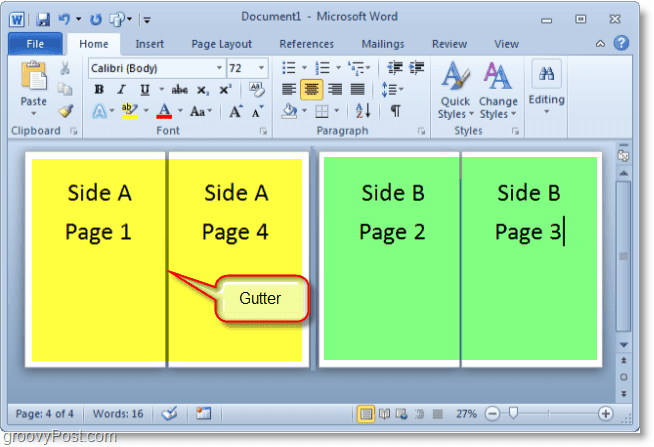
3. Create your booklet content,
keep in mind that content is going to be printed differently than a
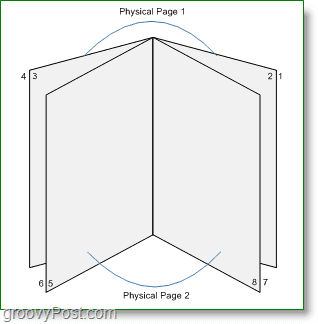
normal document. Page 1 and 4 will be printed on the same side, as Page
2 and 3 will be on the opposite side. Each page size will be shrunk to
the size of half of normal page in landscape mode. The image below
should help illustrate.
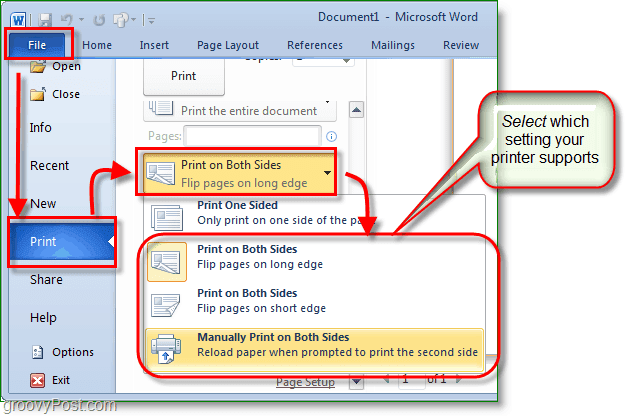
4. When you are ready to print Click File then Print
and change the printing preference to the correct setting for your
printer. If your printer can automatically re-feed itself printed
documents then use one of the Print on Both Sides settings, but if your printer requires you to manually re-insert your paper Select Manually Print on Both Sides.
Now you can continue adding pages and design your booklet to be as large as you like! Don’t forget that the larger you make your booklet the larger you’ll need to make the Gutter so page content doesn’t get lost in the cracks when you bind them together.
Kalau tak berapa faham tengok video kat bawah:
Selamat mencuba! Untuk lain-lain tutorial lihat bahagian tutorial.


0 comments:
Post a Comment